Vuex 的引入
Vuex 作为 Vue 的插件,我们先看我们通用的使用场景
import Vue from 'vue'
import Vuex from 'vuex'

Vue.use(Vuex)

const store = new Vuex.Store({
  // 一些配置项
})

new Vue({
  ...,
  store,
  ...
})
Vuex 的入口是在 src/index.js,默认导出的是一个对象,包括 Store 类,install 方法等等。
export default {
  Store,
  install,
  version: '__VERSION__',
  mapState,
  mapMutations,
  mapGetters,
  mapActions,
  createNamespacedHelpers
}
而 Vue.use(Vuex) 到底发生了什么呢?让我们先把视角切换到 Vue 的源码,Vue.use 方法属于 Vue 构造函数上面的方法,俗称“静态方法”。它的定义是位于 src/core/global-api/use.js。
Vue.use = function (plugin: Function | Object) {
  // 第一步
  const installedPlugins = (this._installedPlugins || (this._installedPlugins = []))
  if (installedPlugins.indexOf(plugin) > -1) {
    return this
  }
  // 第二步
  // additional parameters
  const args = toArray(arguments, 1) // 拿到从第二个参数开始的所有参数
  args.unshift(this) // 将 Vue 构造函数插入到args的第一个
  // 第三步
  if (typeof plugin.install === 'function') {
    plugin.install.apply(plugin, args)
  } else if (typeof plugin === 'function') {
    plugin.apply(null, args)
  }
  // 最后一步
  installedPlugins.push(plugin)
  return this
}
Vue.use 方法接收的第一个参数可以是一个对象或者一个函数。
- 判断 plugin 是否重复安装;
- 用 args 数组存储除了第一个参数之外的所有参数,并且把 Vue构造函数 插入到 args 的头部;
- 判断第一个参数的类型,如果是函数,直接以 args 作为入参执行。 如果是对象, 直接以 args 作为入参执行该对象的
install方法 - 缓存安装过后的插件并且返回 this 实现链式调用。
从以上分析可以得知,Vue.use(Vuex) 这个执行过程无非就是执行了 Vuex.install(Vue)。我们再将视角切换回 Vuex 的源码,install 是在 src/store.js 定义的。
export function install (_Vue) {
  // 第一步
  if (Vue && _Vue === Vue) {
    if (process.env.NODE_ENV !== 'production') {
      console.error(
        '[vuex] already installed. Vue.use(Vuex) should be called only once.'
      )
    }
    return
  }
  // 第二步
  Vue = _Vue
  applyMixin(Vue)
}
执行该方法。入参是 Vue 构造函数。
- 如果重复安装的话, 在开发环境是在控制台打印一个 Error。
- 缓存传入的 Vue,执行
applyMixin函数。
export default function (Vue) {
  const version = Number(Vue.version.split('.')[0])
  // Vue 2.+ 进入这个逻辑
  if (version >= 2) {
    Vue.mixin({ beforeCreate: vuexInit })
  } else {
    // override init and inject vuex init procedure
    // for 1.x backwards compatibility.
    const _init = Vue.prototype._init
    Vue.prototype._init = function (options = {}) {
      options.init = options.init
        ? [vuexInit].concat(options.init)
        : vuexInit
      _init.call(this, options)
    }
  }

  /**
   * Vuex init hook, injected into each instances init hooks list.
   */

  function vuexInit () {
    const options = this.$options
    // store injection
    if (options.store) {
      this.$store = typeof options.store === 'function'
        ? options.store()
        : options.store
    } else if (options.parent && options.parent.$store) {
      this.$store = options.parent.$store
    }
  }
}
执行 applyMixin 函数,相当于调用 Vue.mixin 方法,并且传入了一个 含有 beforeCreate 属性的对象。这是一个生命周期的钩子函数,因为是通过 Vue.mixin 混入的,会导致所有的组件实例都会执行这个生命周期的钩子函数,也就是 vuexInit 方法。我们先来分析为什么所有的组件实例都会执行这个 beforeCreate 的生命周期钩子函数。Vue.mixin 方法则是我们的切入点。我们再次回到 Vue 的源码 的 src/core/global-api/mixin.js。
Vue.mixin = function (mixin: Object) {
  this.options = mergeOptions(this.options, mixin)
  return this
}
函数内部的 this 是指向 Vue 构造函数的,mergeOptions 就是对 Vue.options 做一次 merge,也就是得到如下的结构。
Vue.options = {
  beforeCreate: vuexInit
}
那么得到这个结构是为了干什么呢?我们先从 new Vue(options) 谈起,Vue 构造函数会执行 _init,函数是位于 src/core/instance/init.js,其中里面有这么一段代码:
// merge options
if (options && options._isComponent) {
  // optimize internal component instantiation
  // since dynamic options merging is pretty slow, and none of the
  // internal component options needs special treatment.
  initInternalComponent(vm, options)
} else {
  vm.$options = mergeOptions(
    resolveConstructorOptions(vm.constructor),
    options || {},
    vm
  )
}
因为我们执行 new Vue(options),会走到 else 分支,我们注意到 resolveConstructorOptions(vm.constructor) 这部分,这个是为得到 Vue 或者 通过 Vue 扩展的子类的构造函数的 options 属性,并且与传入的 options 做一次 merge操作。也就是每次实例化 Vue 的时候,都会拿到构造函数的 options 与传入的 options 做一次 merge。那么有些人就会好奇,如果我执行 new Vue(options) 中 options 也含有 beforeCreate 钩子,那后者会不会覆盖通过 Vuex 插件 install 时混入的 {beforeCreate: vuexInit}。这里就会涉及到 Vue 做 mergeOptions 的 策略了。因为我们知道,在写一个 Vue 组件的时候,往往会配置很多属性,包括 methods, computed 还有各种生命周期的钩子函数等等,所以 Vue 针对各种属性的合并做了不同的 strategies。它是位于 src/core/util/options.js。其中有一段代码是关于合并生命周期的 strategy:
function mergeHook (
  parentVal: ?Array<Function>,
  childVal: ?Function | ?Array<Function>
): ?Array<Function> {
  return childVal
    ? parentVal
      ? parentVal.concat(childVal)
      : Array.isArray(childVal)
        ? childVal
        : [childVal]
    : parentVal
}
/* [
  'beforeCreate',
  'created',
  'beforeMount',
  'mounted',
  'beforeUpdate',
  'updated',
  'beforeDestroy',
  'destroyed',
  'activated',
  'deactivated',
  'errorCaptured'
] */
LIFECYCLE_HOOKS.forEach(hook => {
  strats[hook] = mergeHook
})
对于 beforeCreate 的策略,是将其对应的函数推到一个数组里面。等到钩子触发时候,依次执行。所以我们来看下 vuexInit 的执行逻辑。
function vuexInit () {
  const options = this.$options
  // store injection
  if (options.store) {
    this.$store = typeof options.store === 'function'
      ? options.store()
      : options.store
  } else if (options.parent && options.parent.$store) {
    this.$store = options.parent.$store
  }
}
首先得到 merge 过后的 $options,我们 new Vue({store}) 时候,会进入 if 分支,也就是当前根 Vue 实例的 $store 是存储了 store 实例。那么什么情况会走到 else if 分支呢。实际上,在子组件的初始化过程当中,是走到 else if 分支。Vue 项目的初始化其实是一个树的深度遍历过程(如下图所示)。
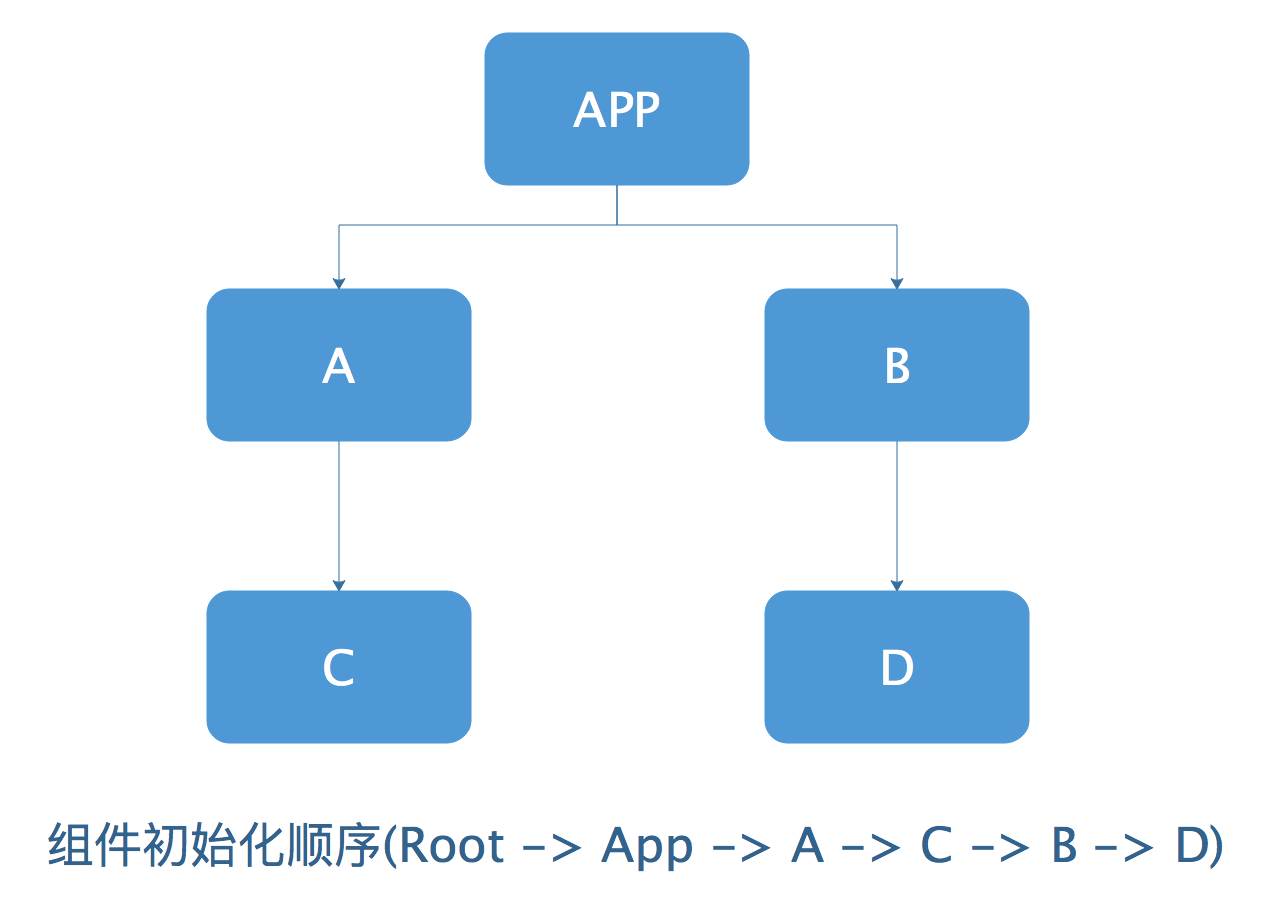
由于树的深度遍历,所以子组件都能通过一定方式获取到父组件,这样能保证 options.parent.$store 取到的是 options.store。
总结
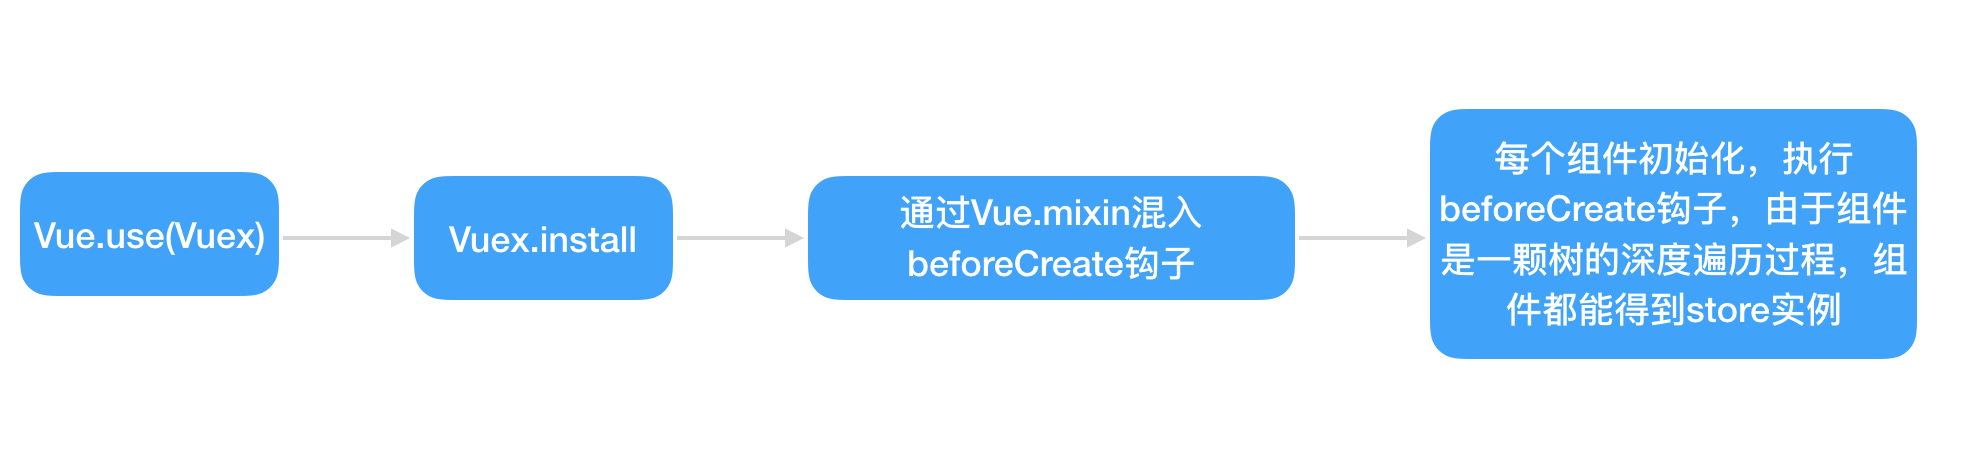
这一章节,我们分析了 Vuex 的设计,并且知道为什么能够在每个组件获取同一个 store 实例,以及 Vue.use(Vuex) 的整个流程与触碰到的原理。下面我们再用一张图来简单梳理下整个过程。